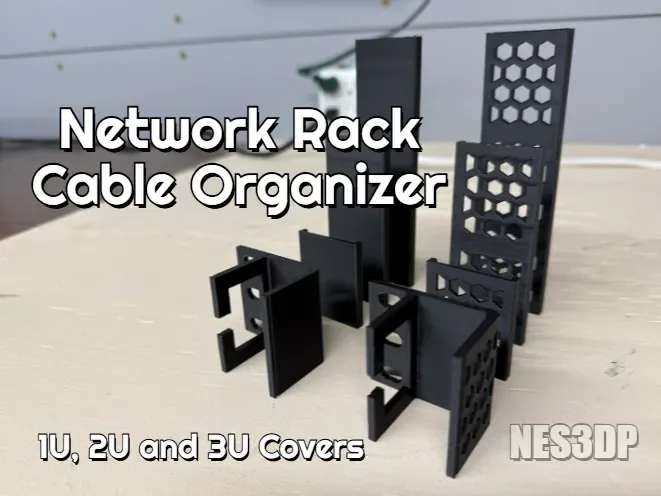
 Design reference photo
Creator photo; included parts are listed below. Accessories not included.
Network Rack Cable Organizer — 1U
3D printed in PETG for organizing cables in a compatible rack.
Shipping within Canada is included in the listed price. Applicable taxes are calculated at checkout. Secure checkout for Canadian shipping addresses. Choose your quantity on Stripe. Shipping to the U.S.? Contact us for a shipping quote before ordering. U.S. shipping is an additional charge.
Check fit before ordering ↓A closer look
3D printed in PETG for organizing cables in a compatible rack. Includes one solid 1U base and one matching solid cover; additional modules excluded. Hardware, devices, accessories shown and installation are not included.
Check the fit
Start with these details so you can choose the right part for your setup.
- Confirm your board, connector or rack dimensions and mounting-hole pattern before ordering.
What’s included
- One solid 1U base and one matching solid cover; additional modules excluded.
- Hardware, devices, accessories shown and installation are not included.
Organize a specific cable transition in the rack
This 1U organizer is a useful option when a small group of cables needs a defined route at one point in a rack. Start with the transition that is currently difficult to manage: a lead leaving a device, a bundle changing direction, or a spot where cables obscure labels. Positioning the organizer around that actual need can preserve a clearer service area without rearranging the entire rack. The supplied solid base and matching solid cover form one local organizing unit. Plan the number of units around the number of transitions you need to control; the 1U name should not be read as a promise of a full-width panel or a complete modular system.
Check the assembled route and cover access
Compare the proposed mounting location with the organizer geometry and the fixing method your rack requires. The two listed component sizes are approximately 36.25 × 43.67 × 5 mm and 49.42 × 31.97 × 43.63 mm. These describe the separate printed pieces and do not establish the free cable space after assembly. Test the intended cable group with realistic bends and connector positions, then check that the cover can be fitted and removed without pushing against neighbouring equipment. Leave access for your fingers and for connector release tabs. If you plan several organizers in a row, consider whether the first installed unit will obstruct fitting or servicing the next.
Make future cable changes straightforward
Route a manageable group through the organizer and leave the rest of the rack easy to trace. Avoid using the cover to compress an oversized bundle into place; the cable group should fit naturally with room for its required bend shape. Keep useful labels outside the covered area so a connection can be identified before opening anything. When changing equipment, remove the cover deliberately and support the cables while rerouting them. The PETG base and cover should remain free of trapped jackets and loose debris. Inspect their seating after a change, and keep devices supported independently. A well-chosen local route is particularly useful when you want to add or remove one lead without unthreading the entire rack.
Product questions
What does the listed price include?
One solid 1U base and one matching solid cover; additional modules excluded. Shipping within Canada is included in the listed price. Applicable taxes are calculated at checkout. Hardware, devices, accessories shown and installation are not included.
Will this match everything shown in the photo?
The creator photo is a design reference and may show other variants, quantities or accessories. The included-parts list describes exactly what this listing supplies.
Does one unit span the full rack width?
The listing supplies one solid base and one matching cover, with additional modules excluded. Check the component geometry and your planned arrangement; the 1U designation alone does not describe a full-width cable panel.
Can I add another cable later?
Possibly, if the assembled organizer still has space for it without compression or excessive bending. Plan some working room when selecting the original group and check the cover seating again after adding a lead.
Where should cable labels go?
Place identification where it remains visible with the cover installed and does not interfere with the cable seats. Labels near accessible ends make it easier to confirm the correct lead before opening the organizer.
Original design: NES 3D — Network Rack Cable Organizer (1U/2U/3U). MakerWorld model 1758420. Original design