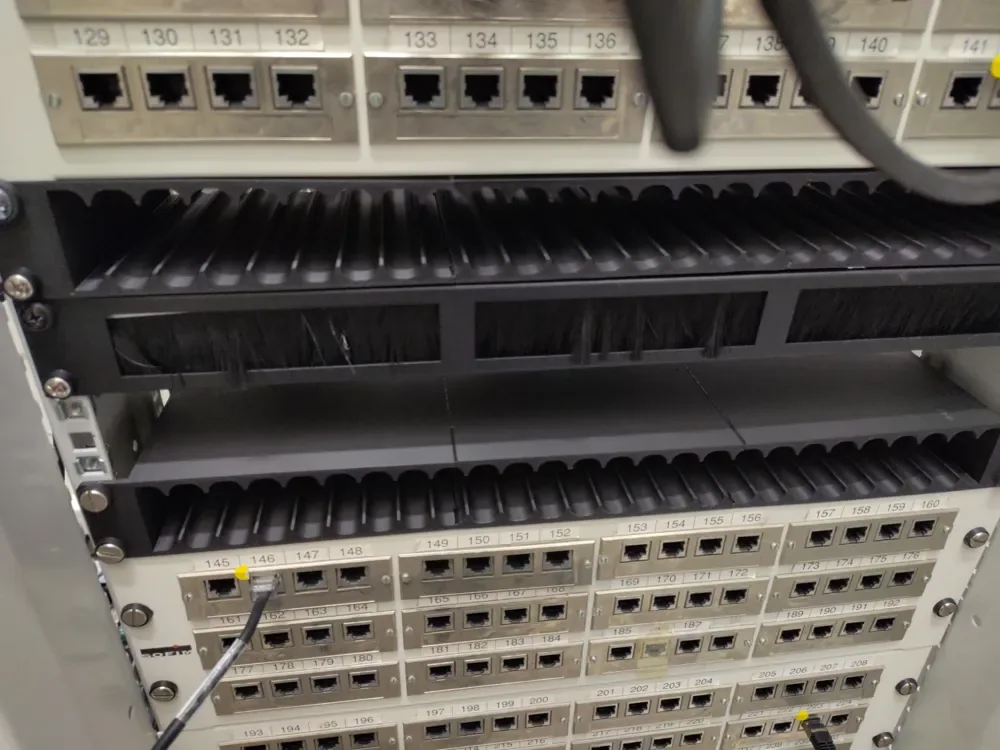
 Design reference photo
Creator photo; included parts are listed below. Accessories not included.
19-inch 1U Cable Management Panel — Printed Parts
3D printed in PETG for routing cables across a compatible rack.
Shipping within Canada is included in the listed price. Applicable taxes are calculated at checkout. Secure checkout for Canadian shipping addresses. Choose your quantity on Stripe. Shipping to the U.S.? Contact us for a shipping quote before ordering. U.S. shipping is an additional charge.
Check fit before ordering ↓A closer look
3D printed in PETG for routing cables across a compatible rack. Includes one assembled panel's four printed sections. Hardware, devices, accessories shown and installation are not included.
Check the fit
Start with these details so you can choose the right part for your setup.
- Confirm your board, connector or rack dimensions and mounting-hole pattern before ordering.
What’s included
- One assembled panel's four printed sections.
- Hardware, devices, accessories shown and installation are not included.
Plan the patching route before filling the rack
A cable-management panel is most useful when it sits between the ports you use and the path the cables need to follow. Lay out the intended patch leads before deciding which rack position to reserve for this 19-inch 1U design. Consider where cables enter the rack, which devices are likely to be changed, and whether a front door must close over the finished route. Keeping those movements in mind can reduce the need to disturb several unrelated leads when changing one connection. The four printed sections belong to one panel arrangement, so treat their placement as part of a complete routing plan rather than assuming each section is a separate rack accessory.
Check both the rack opening and the depth
The 19-inch and 1U descriptions identify the intended rack format. Confirm the actual rail arrangement, hole positions, available mounting hardware, and surrounding equipment before installation. This design also has depth that needs to be checked against devices, rack doors, and cables behind the front plane. The listed dimensions apply to the individual printed sections; they are not a verified assembled width, depth, or internal cable capacity. Two sections are listed at 168.5 × 44 × 140 mm and two at 146 × 9 × 140 mm. Use the complete assembly arrangement and your rack measurements to resolve fit, especially where the cabinet is shallow or already crowded.
Keep individual connections easy to service
Trial-assemble and position the printed sections before committing to the final cable route. Choose lead lengths that reach comfortably without filling the management space with unnecessary loops. Keep enough access to release connector latches and avoid drawing a bundle tightly across a port. Label leads where the labels will remain readable after routing, and check the required bend guidance for your particular cables. The PETG sections are intended for cable organization, so equipment should have its own appropriate rack support. After changes, close any cabinet door slowly while checking for interference. Periodically look for trapped leads or sections that have shifted; service access is easier to preserve when the cable route is reviewed a few connections at a time.
Product questions
What does the listed price include?
One assembled panel's four printed sections. Shipping within Canada is included in the listed price. Applicable taxes are calculated at checkout. Hardware, devices, accessories shown and installation are not included.
Will this match everything shown in the photo?
The creator photo is a design reference and may show other variants, quantities or accessories. The included-parts list describes exactly what this listing supplies.
Can I calculate cable capacity from the part dimensions?
No reliable cable count follows from the component bounding dimensions. Capacity depends on the assembled route, cable diameter, connector bulk, bend requirements, and the space you need to remove or add individual leads.
Does it replace a shelf for rack equipment?
No equipment-support function is specified. Use this panel for organizing cable routes and support switches, power supplies, and other devices with mounting arrangements intended for those items.
What should I measure in a shallow cabinet?
Check rail-to-door clearance, space behind the mounting plane, and the projection of connected plugs and cable bends. Include neighbouring equipment, since a panel that fits the rails may still obstruct a nearby connection.
Original design: user_1928783315 — Cable Managment unit 1U for 19 inch rack. MakerWorld model 1687170. Original design